Working with Excel often means adding new data in between existing rows. Whether you’re updating a list, inserting transactions, or cleaning up a spreadsheet, knowing the quick ways to insert a row will save you time.
Remember: Rows always rise above — meaning, any new row you insert will always appear above your active cell or selected row.
Insert a Row in Excel Using the Right-Click Menu
The quickest options are right-click Insert, the Home → Insert → Insert Sheet Rows button, or a keyboard shortcut.
The easiest method for most users:
- Select the row where you want the new row to appear above.
- Right-click the row number on the left.
- Click Insert.
Quick Tip: Think “Right-click, Insert, Done” — three simple steps to add a row.
Using Excel may seem intimidating but it doesn’t have to be. Take time to understand the basics, go through step-by-step processes, and you’ll be using it like a pro in no time.
Let's explore Excel rows and columns and learn more of the easy ways we can add or delete rows and columns in Excel. Nailing these tasks down allows you to easily add or delete information within any spreadsheet.
You Can Insert Excel Rows from the Row Numbers
Row Numbers are on the leftmost part of the spreadsheet.
Let’s insert a row:
1. Click the row number. (This will select the entire row.)
2. Right-click and Press “Insert”. (This will automatically insert a row above.)
Let’s insert multiple rows:
1. Click the row numbers. (This will select the entire rows.)
2. Right-click and Press “Insert”. (This will automatically insert multiple rows above.)
You Can Add Excel Rows Using the Menu
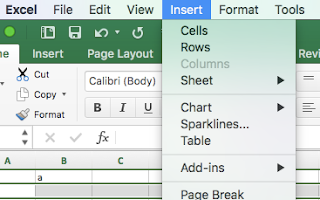
The Menu is on the topmost part of the Excel Window.
Let's use the top menu:
1. Click the row number (or row numbers to insert multiple rows).
2. Click “Insert”. (This is the 5th tab on the top menu.)
3. Click “Rows”. (This will automatically insert a row or multiple rows above.)
.jpg) You Can Insert an Excel Row Using the Shortcut Keys
You Can Insert an Excel Row Using the Shortcut Keys
Let's use some Shortcut Keys on your computer keyboard.
1. Click the row number (or row numbers to insert multiple rows).
2. Press the following keys: Ctrl – Shift - +. This will automatically insert a row (or multiple rows) above.
You Can Add an Excel Row Using the Ribbons
The Ribbons will be above the Excel Spreadsheet (but below the main Menu on top).
1. Click the row number (or row numbers to insert multiple rows).
2. Click on the “Home” Ribbon Tab. (This is on the leftmost side of the spreadsheet below the Top Menu.)
3. Icons (or symbols) will appear.
4. Click the arrow to the right of the “Insert” Icon. (This is on the right side of the spreadsheet.)
5. Click “Select Sheet Rows.” (This will automatically insert a row (or multiple rows) above.)
Using Microsoft Excel is not that Hard!
Now, you’ve learned four ways to insert or add a row or multiple rows on an Excel Spreadsheet. Practice using these options, and you’ll memorize the steps in no time.


.jpg)
.jpg)

.jpg)
Comments
Post a Comment
Thanks for visiting. Love to hear your thoughts or questions in the comments box!